Note: AWeber has now retired legacy follow ups, so this tutorial is archived.
When it comes to setting up your dynamic campaigns, your first decision is usually going to be how to set up your lists and followup sequences in AWeber.
Let’s take, as an example, a simple dynamic campaign that:
- Sends up to 3 ‘engagement’ reminders to encourage consumption of some topic
- Sends up to 3 content videos to those subscribers who engage
The two main ways to achieve this would be:

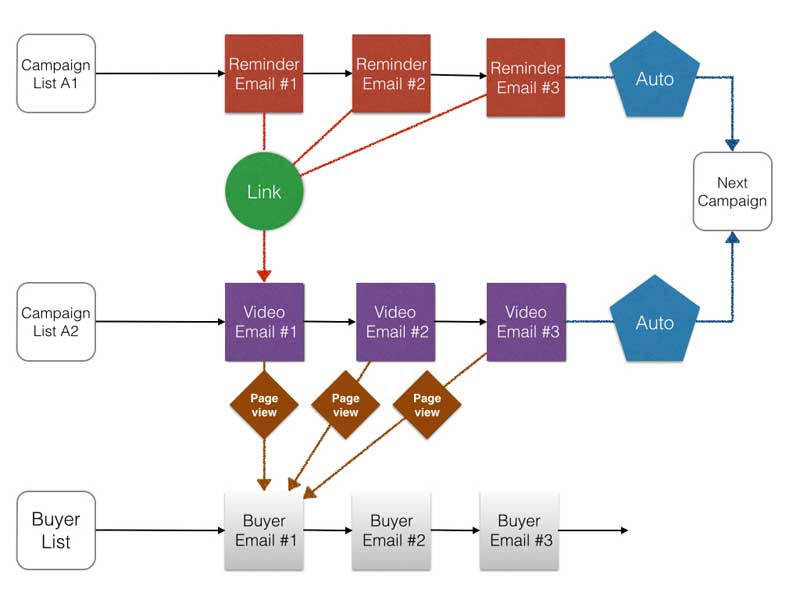
Option 1: Use two lists for the campaign:
- Put the engagement reminder emails in one list (LISTA1)
- Put the video content emails in another list (LISTA2)
- Use a link event in the reminder emails to move subscribers from LISTA1 to LISTA2
- Use an automation event at the end of LISTA1 to handle non-clickers
- Use an automation event at the end of LISTA2 to handle non-purchasers
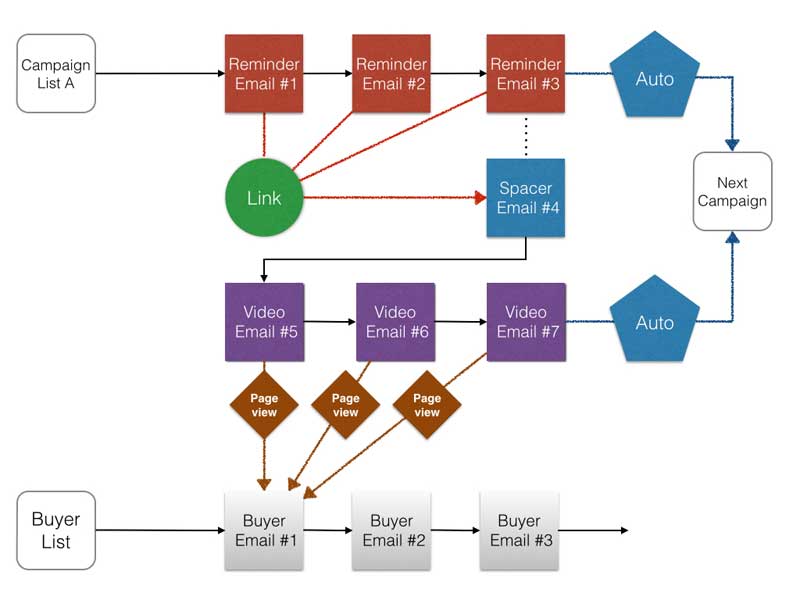
Option 2: Use a single list with spacer email:

- Put all the engagement reminders and video content emails into one list (LISTA)
- Separate reminders and content emails with a blank ‘spacer’ email
- Set spacer delay to 999 days, and first content video (#5) delay to 0
- Use a link event in the reminder emails to set the spacer as last followup received
- Use an automation event on email #3 to handle non-clickers
- Use an automation event at the end of LISTA to handle non-purchasers
Personally, I like to try and use as few AWeber lists as possible, and “one list per dynamic campaign” ideally, so that all the elements for a single campaign are kept all together.
This creates a small challenge due to the way AWeber tracks subscriber progress through a campaign, and this is where the “spacer” email comes into play.
How The Spacer Email Works
Firstly, you need to know that a spacer email is nothing special – it’s simply a standard followup email in your sequence. The difference is that it is never sent to subscribers.
It only exists to help us figure out where the subscriber is in the sequence, and helps AWeber figure out when and what to send next.
You see, AWeber tracks subscribers progress through followup campaigns using three pieces of information:
- The last followup message that the subscriber received
- The date it was sent
- The next followup delay interval
It simply looks at when the subscriber last got an email, and sends the next followup email if its delay interval has passed.

So, if we create a spacer email set to go out 999 days after the last email, it effectively creates a barrier to subscriber progress through the sequence.
Lets imagine that we want to set up our campaign to do the following:
- Give subscribers 7 days to engage before moving on
- Send the first video email (#5) immediately after they click the link in a reminder email
Here’s how using a spacer email makes it super simple to setup inside a single AWeber list.

Now, subscribers can only go one of two ways: either they click the link event or they get scooped up by the Automation event after 7 days and sent on to the next campaign.
If they click the link event, their last followup received is set to the spacer email, and AWeber is then free to send the first video content email immediately – as that has a delay of 0.
Ultimately, it doesn’t really matter whether you use the single or multiple lists approach, but if you like to keep things tidy and self contained like me, then the spacer email is your friend!
Please leave your feedback on this technique below.
Cheers
Rob
Ps – I walk through the setup of a single list campaign using a spacer email in this video.
