Table of Contents
Note: AWeber has now retired legacy follow ups, so this tutorial is archived.
If you’ve been in internet marketing for any time, you’ll no doubt know of Ryan Deiss and his team at Digital Marketer.
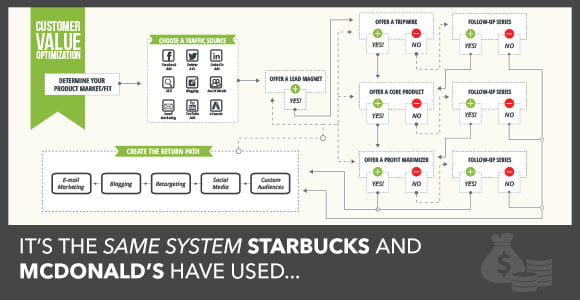
Even if you haven’t, you’ve probably come across the concepts of the “Lead Magnet”, “Tripwire Offer”, “Core Offer” and “Profit Maximizer” that are the cornerstones of their Customer Value Optimisation (CVO) process.
Anyhow, in this tutorial, I’m going to show you how to create their core Customer Value Optimisation (CVO) process, using AWtomator and AWeber.
Overview
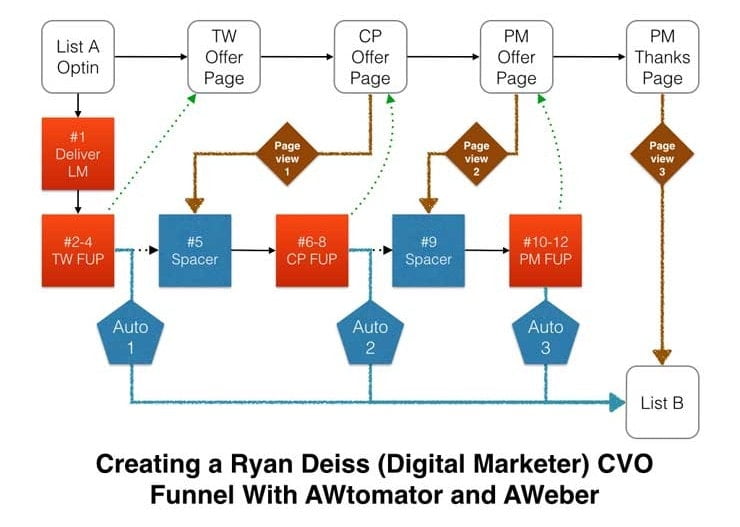
Here is what you’ll end up with at the end of this tutorial.
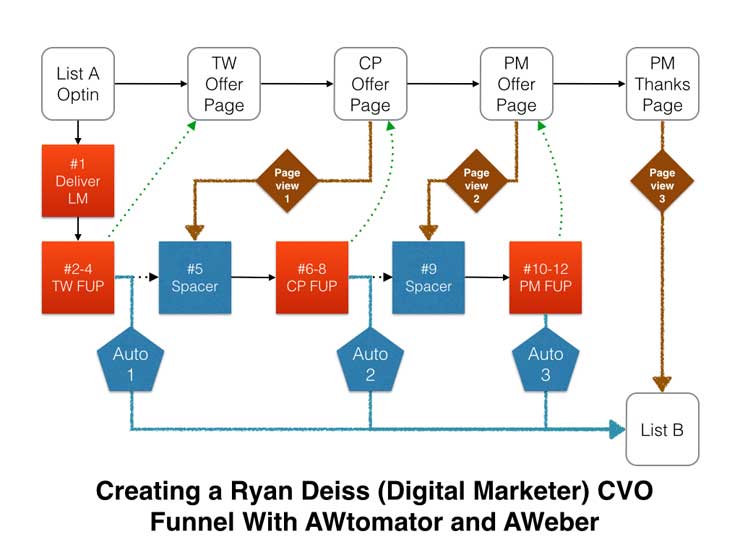
The action starts as soon as the subscriber opts in for the Lead Magnet and they are placed on “List A”. The first email in the sequence delivers the Lead Magnet, and whilst the subscriber is waiting for it to arrive, they are automatically redirected to the Tripwire Offer Web Page.
If they don’t buy the TripWire, they get followup emails #2-4, which link back to the Tripwire Offer page. At that point, if they still haven’t bought and have been on email #4 for a pre-defined period, the first Automation event (Auto 1) will move them to List B (which is our “Return Path” list).
If they buy the Tripwire offer, and reach the upsell offer page for the Core Product, then they skip forward to email #5 thanks to PageView Event 1 and they are then ready to start receiving the Core Product followups.
If they don’t buy the Core Product, they get followup emails #6-8, which link back to the Core Product Offer page, and eventually they get moved to List B by the second Automation Event (Auto 2).
If they buy the Core Product, and reach the upsell offer page for the Profit Maximizer, then they get moved to email #9 by PageView Event 2, and they are then ready to start receiving the Profit Maximizer followups.
If they don’t buy the Profit Maximizer, they get followup emails #10-12, which link back to the Profit Maximizer Offer page, and eventually they get moved to List B by the third Automation Event (Auto 3).
If they buy the Profit Maximizer , and reach the final order thanks page, then they get moved to List B by PageView Event 3, and they are then ready to start another CVO sequence!
Here’s how to set it all up…
Step 1: Set up “List A” in AWeber
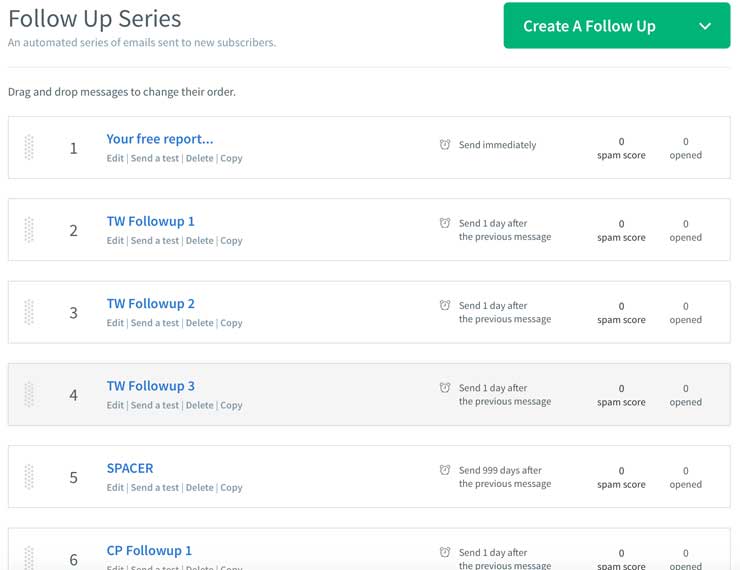
The first thing to do is setup a new list in AWeber that will hold all the followups in this CVO campaign and set the AWeber “Confirmation Success Page URL” (List Settings > Confirmed Opt-In) to your Tripwire Offer Page.
Our overview shows three emails per product followup sequence, but you can adapt this to suit your needs.
Note that the spacer emails are set to go out 999 days after the previous email, which creates a barrier to progress in the sequence. The subscriber has only two ways go:
- Either they purchase and get moved past the spacer by a pageview event, ready to get the next followup email a day later.
- Or they don’t, and they are moved to List B by an automation event.
You can read more about the spacer email here.
If you think you might want to change the number of followups later on, then instead of using one list and spacer emails, you might prefer to use separate lists for each product followup and to move subscribers between lists with the pageview events. See the spacer tutorial for more info.
Step 2: Set up Your Automation Events
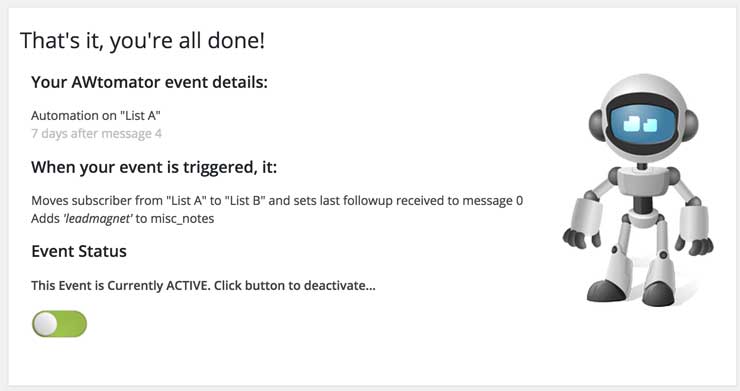
In this tutorial, we want to give the subscriber 7 days to purchase each product, before we move them to List B. So we’re going to need 3 automation events, as follows:
- Auto 1: 7 days after email #4
- Auto 2: 7 days after email #8
- Auto 3: 7 days after email #12
The image above shows “Auto 1” all set up in AWtomator, and shows how you can also tag your subscriber so you know more about where they have been in your funnel. You can use tagging to segment subscribers for broadcast messages later on. See this tutorial for more details.
Step 3: Set up Your Pageview Events
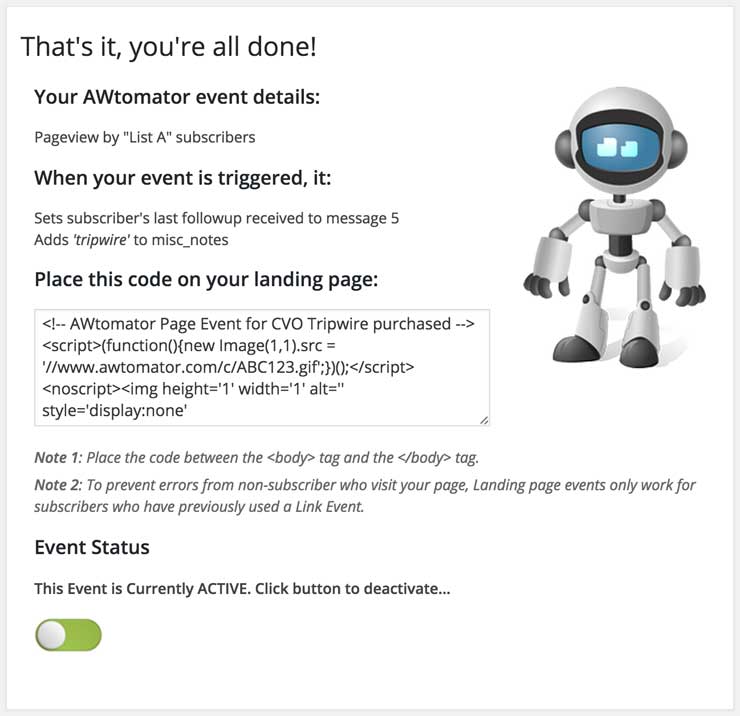
In this tutorial, we are going to use Pageview Events to move the subscriber on in the sequence whenever they make a purchase. To do this, we are going to need 3 pageview events, as follows:
- Page View 1: This will set the subscriber’s last message to spacer email #5 when they land on your Core Product Offer web page (image above shows this event)
- Page View 2: This will set the subscriber’s last message to spacer email #9 when they land on your Profit Maximizer Offer web page
- Page View 3: This will move the subscriber to List B when they land on your Profit Maximizer Order Thanks web page
Optional, but recommended
Pageview events only fire where AWtomator can identify the subscriber, so you might consider using Link Events when linking back to the sales pages. This will ensure that the subscriber is always identified to AWtomator, even if they are on a different computer when they finally make a purchase.

