Table of Contents
AWtomator Link Events create email links which can be set to expire at a fixed time, or relative to the date the email is sent.
This means as well as one-off offers, you can also create evergreen time limited launches and offers that have genuine scarcity, without having to swap out links or pages once they’ve expired.
When the link expires, you can redirect subscribers to another URL – perhaps a “sorry you missed out” page, or another offer.
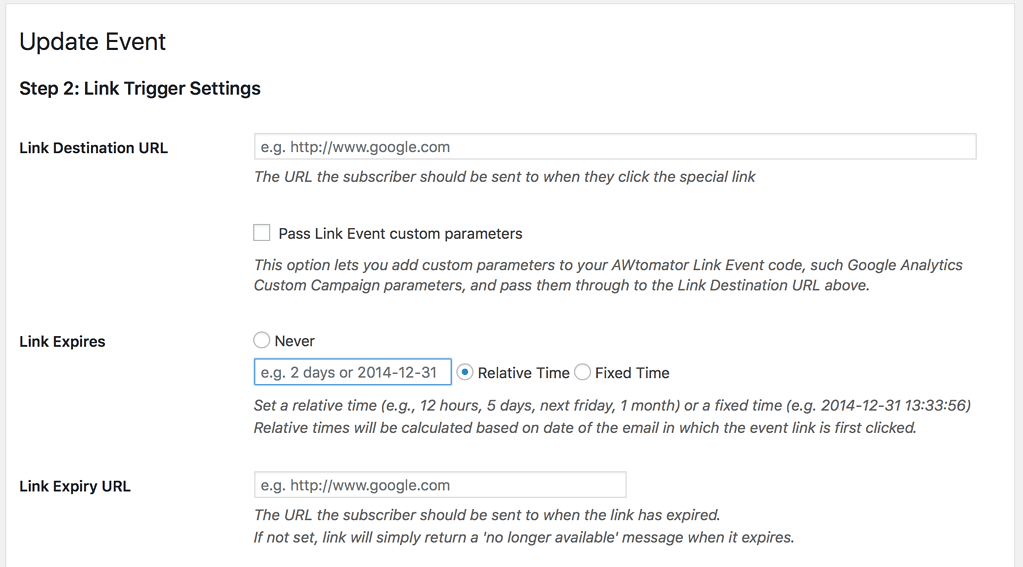
Here’s what the Link Event Expiry settings look like:

Setting A Fixed Expiry Time
You can use a fixed time expiry for one-off offers that must end at the same time for all subscribers, regardless of when emails were sent out.
AWtomator stores fixed expiry times as “YYYY-MM-DD HH:MM:SS UTC”, but you can use most recognised date/time formats, and even a relative date format to set the date/time.
For example:
- 2017-01-12 23:59:59
- 18th March 2017
- March 2017
- 21 Jan 2017
- midnight friday EST
- last sat of July 2017 16:00:00 EST
If AWtomator can’t work out the date you entered for any reason, you’ll see an error displayed when you hit the “Next” button
Remember:
Dates are stored and displayed in “YYYY-MM-DD HH:MM:SS UTC” format, so be aware the date will look different if you specified a timezone.
For example, 2017-01-12 23:59:59 EST will be stored and displayed as 2017-01-13 04:59:59 UTC as EST is 5 hours behind UTC (UTC-5).
Setting A Relative (Evergreen) Expiry Time
This is where the expiry date is set per subscriber, relative to the date of the email.
You can use a relative time in evergreen offers to give each subscriber the same period of time to respond, regardless of when they get the email.
As above, you can use a variety of relative date/time formats to set the expiry time.
For example:
- +5 hours
- next friday
- tomorrow midnight EST
- 7 days
- midnight friday EST
- last sat of July 2017 16:00:00 EST
If AWtomator can’t work out the date you entered for any reason, you’ll see an error displayed when you hit the “Next” button.
Pro Tips:
- You can use any PHP relative date format to set your relative date.
- When using more complicated relative dates (e.g. “Monday next week 9pm PDT”), you can test it by first saving the event with the “fixed time” radio button selected, then editing the event again to see what fixed date was set. If it’s what you expected, then you can re-enter and save as a relative time.
- Once used, a relative link remains expired even if the subscriber is later re-added to a Campaigns sequence, unless you reset the Link Event.
Creating An Evergreen Expiring Countdown Sequence
Links with relative expiry dates use AWeber’s dynamic email content feature to supply AWtomator with the date the email was sent. This is used to calculate the expiry date.
So if you have a series of reminder emails that countdown to a relative expiry date, it is generally more accurate (and simpler) to create a Link Event per email.
You simply duplicate your original Link Event and change the relative expiry date so it corresponds to the time remaining!
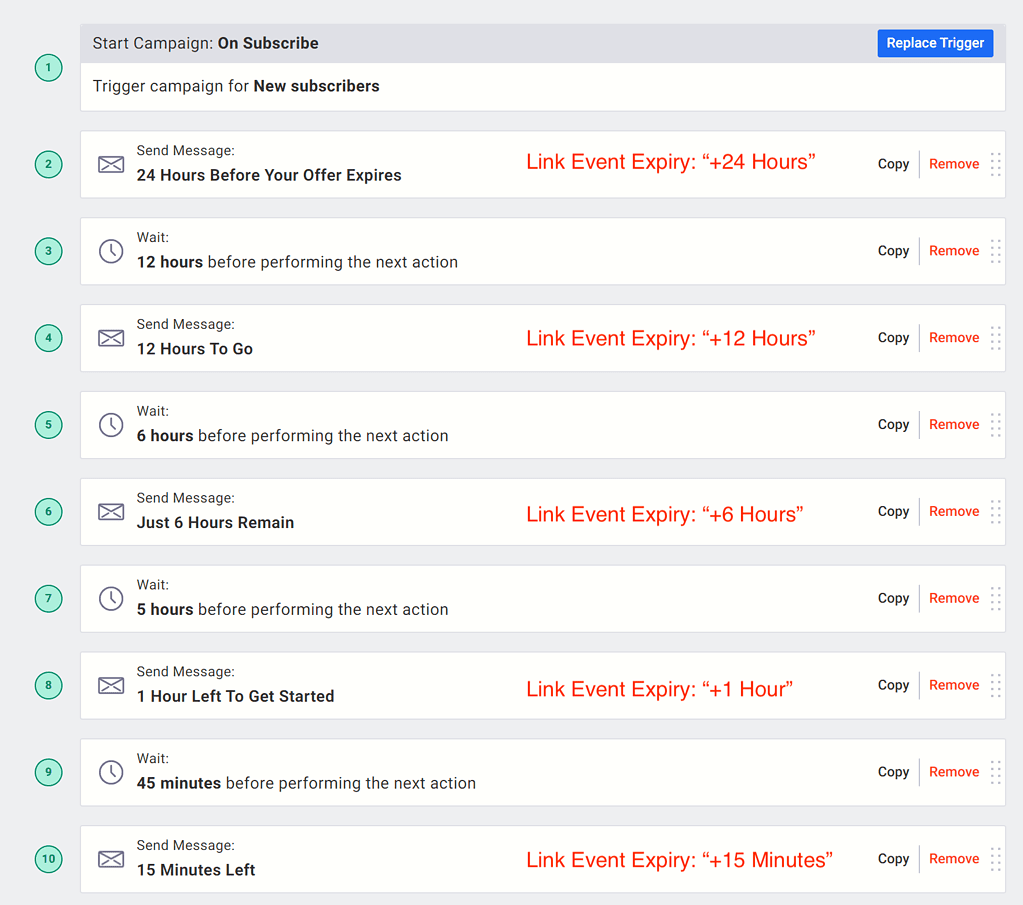
Here’s an example of a countdown campaign – note how each AWtomator Link Event expiry time would be relative to the time remaining in the reminder.

Advanced: Re-using Relative Expiry Links
Some customers like to reuse the SAME Link Event in all their reminder emails.
This is possible, PROVIDING you tweak the AWeber dynamic email content variable to ensure the reported email date is consistent across all the reminder emails.
For example, let’s say you have a 4 day countdown sequence. You would tweak the shift_days part of the link event each day like so:
Day 1: Use the regular link
https://www.awtomator.com/c/abc123&e={!email}&d={{ now | date_format(fmt='YYYYMMDDHHmmssZ', shift_days=+0) }}Day 2: Tweak shift_days=-1
https://www.awtomator.com/c/abc123&e={!email}&d={{ now | date_format(fmt='YYYYMMDDHHmmssZ', shift_days=-1) }}Day 3: Tweak shift_days=-2
https://www.awtomator.com/c/abc123&e={!email}&d={{ now | date_format(fmt='YYYYMMDDHHmmssZ', shift_days=-2) }}Day 4: Tweak shift_days=-3
https://www.awtomator.com/c/abc123&e={!email}&d={{ now | date_format(fmt='YYYYMMDDHHmmssZ', shift_days=-3) }}This way, every link in every email will report the same date as Day 1, and it won’t matter which email link the subscriber clicks.
Alternatively, if your sequence is triggered “on subscribe”, you could use the subscriber SIGNUP date as the base for your relative links.
In this case, you could modify the link like so to change the portion after &d=:
https://www.awtomator.com/c/abc123&e={!email}&d={{ subscriber.signup.date }}Try It For Yourself!
Enter your email below to get an email with an expiring link in it so you can try this out for yourself.

